Showing posts with label kids. Show all posts

Spider-Man Spaghetti Pie

From admin:  Exciting news!  I have found a blogging partner/friend who shares a passion for cooking and blogging and who has agreed to regularly share her own recipes here at the Recipe Shoebox!  I am thrilled to share her fun and tasty recipes with all of you and I am equally as excited to have a partner to bounce ideas off of and to share in the posting!   Jen is the mom of three very cute boys, so you will find her recipes family friendly and fun, and they will fit right in with the Recipe Shoebox style.  

**************************

Hi there! My name is Jen and I'm so excited to share some new recipes with you. I love this blog and I am always looking for new ideas, especially when it come to finding meals for my picky family to eat.

I came across a blog the other day about a mom cooking in the kitchen with her three young boys. I was hooked as I, too, have three young boys. She had all sorts of fun ideas to make food fun for her kids. So I can not take credit for this idea. Check out "Kitchen Fun with my 3 Sons". I can, however, take credit for going the extra mile and making it just a little better than noodles and sauce. Thus Spider-Man Spaghetti Pie was born. I hope your kids like it just as much as mine did.
Click here for printable recipe. 


The Ingredients:
6 oz. spaghetti (about a handful)
2 Tbsp butter
2 eggs, beaten
1/2 c. Parmesan cheese
1 15 oz carton ricotta cheese
1 jar spaghetti sauce
2 slices white cheese

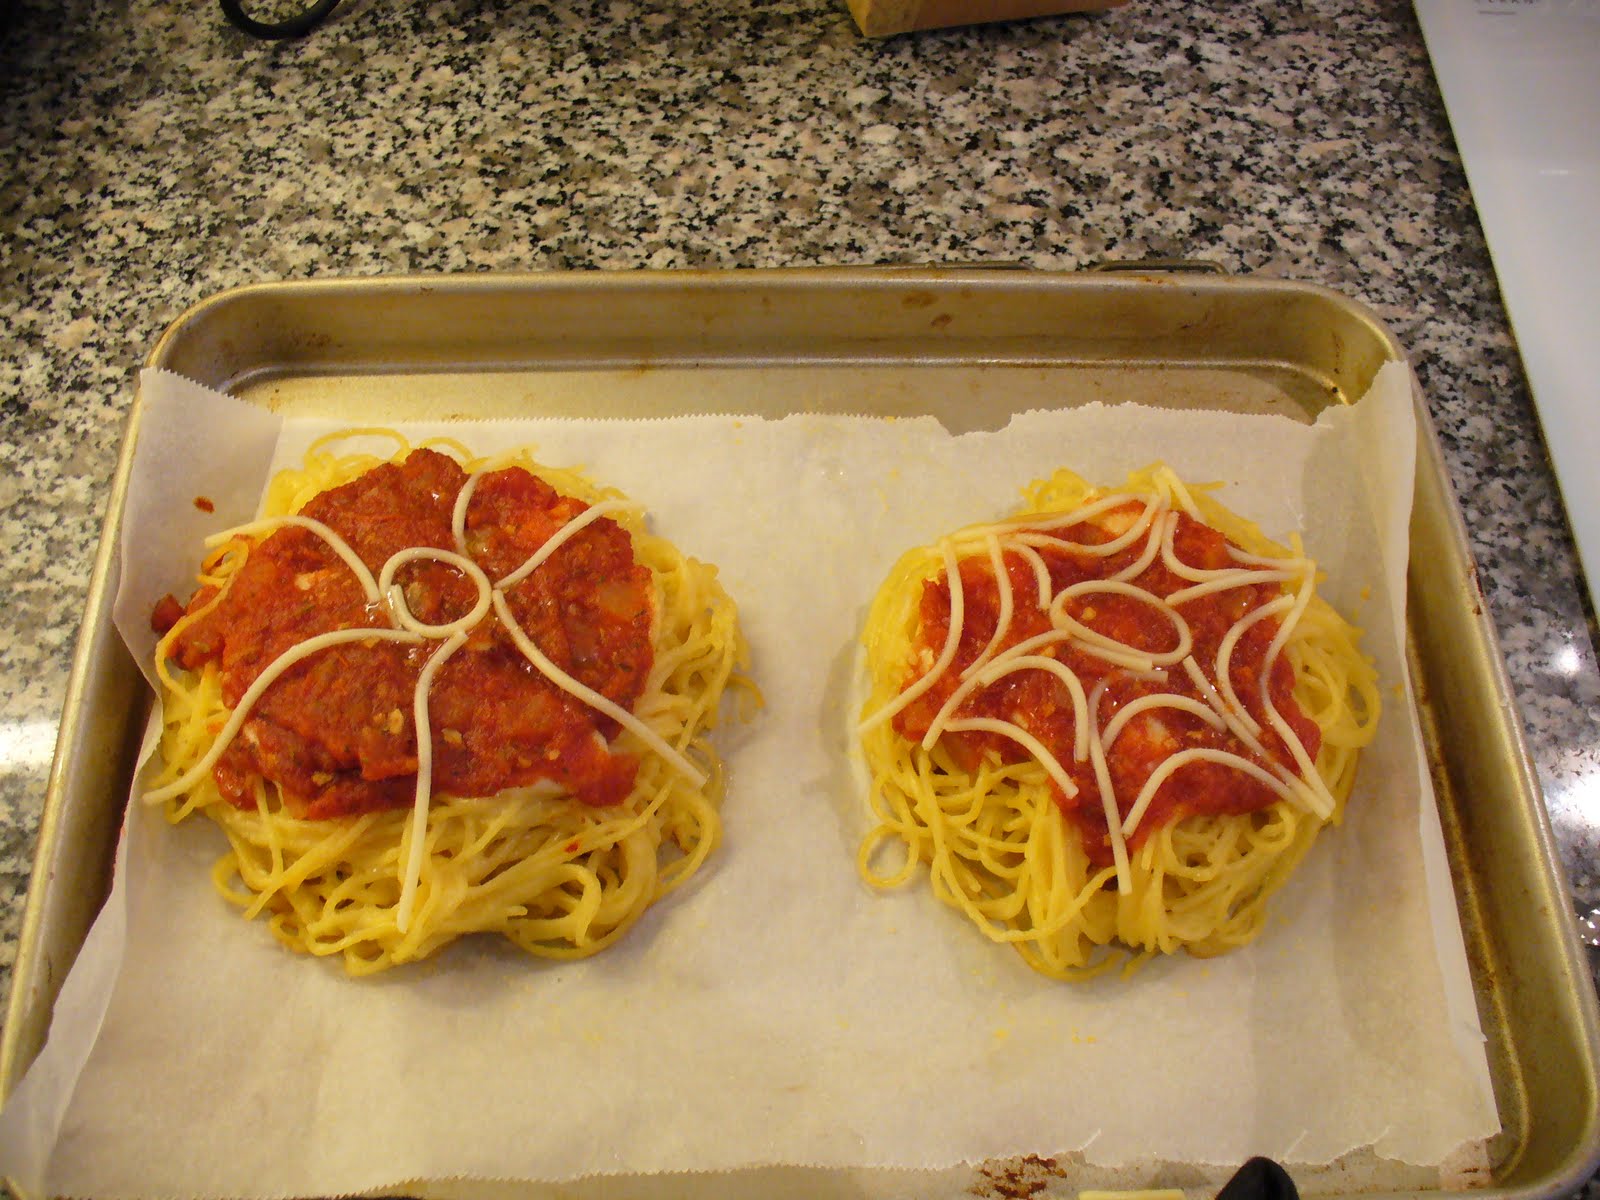
Directions: Cook the spaghetti as directed on package. Meanwhile, cut out shape of Spider Man's eyes onto the sliced cheese and put back in the refrigerator. Preheat your oven to 350ยบ. When the noodles are cooked, remove some and put aside in a bowl of warm water so that they don't stick together. Add the butter to the hot spaghetti and stir until the butter is melted. Add the Parmesan cheese and eggs and stir together until well blended. At this point you can press it into a greased pie plate, OR form mini servings onto a lined cookie sheet. (for mini a Spider Man).
Spread the ricotta cheese over the top of the pressed spaghetti leaving about a 1/2 inch around the edge clear. (Or if you're like me today, and you don't have ricotta then just lay slices of mozzarella over the top of the spaghetti). Spread with spaghetti sauce over the top. Be careful if you're using ricotta that you don't blend the sauce in. We want a red Spider-Man face.
Take the reserved spaghetti noodles and shape the web on the “face”. Since this was the first time I made this I actually put the web on after I cooked it, but I imagine that it would be easier if you made the web before cooking it. Refer to Spidey's face to make the web.
Bake in oven for 30 minutes. After you take it out, add Spider-Man’s “eyes”.

Serve with green veggies and refer to them as the Green Goblin. But we know that superhero Spider-Man will always triumph over Green Goblin vegetables. (At least in my home)


Don't miss a single recipe, sign up for free email updates. 

Popover Upside Down Pizza

Oh me, oh my! 
Now please don't cry.
Although I have no gift for rhythm and timing
I have the urge to go on  rhyming. 

This dish is easy peasy
and oh-so-nice-and-cheesy. 
My kids were gaga with delight
when they saw the top take flight
and pop up into something so puffy
that they could not wait themselves to stuffy. 

After that they excitedly and  without reserve,
said that this dish was something to preserve!
So here it is upon the blog
for you to print and try and hog!
 
Now dear blog readers, don't you fret,
I know I am the worst poet you've (n)ever met,
So in the future, I'll stick to cooking and pans
and leave the rhyming to people who actually can(s).

Click here for printable recipe. 

The ingredients:

1 lb. ground beef (or ground turkey)
1 large onion, chopped
2 cups spaghetti sauce (can substitute with 1 can (15-ounce) tomato sauce plus one envelope spaghetti sauce mix)
1 pkg. (8-ounces) sliced mozzarella cheese ( I used 2 cups of shredded mozzarella instead)
2 eggs
1 cup milk
1 Tbs. oil
1 cup flour
1/2 tsp. salt
1/2 cup grated Parmesan cheese

Directions:  In a large skillet, brown ground beef or turkey with onion.  Pour off excess fat.  Add spaghetti sauce (or tomato sauce and spaghetti sauce mix) and simmer 10 minutes.  Spoon into greased 9x13-inch baking pan. Top with cheese.  Place in 400 degree oven to keep hot. 

To prepare popover batter, beat together eggs, milk, and oil.  Add flour and salt; beat until smooth.  Pour over hot pizza filling, being careful to cover filling completely.  Sprinkle with Parmesan cheese.

Bake at 400 degrees for 30 minutes, until puffed and deep golden brown.  Cut into squares and serve immediately.  Makes 6 servings.

Enjoy! 


Don't miss a single recipe.  Sign up for free email updates (on the right). 

******

Easter Bunny Buns (a cute Easter treat)

My ten-year-old discovered the recipe for these cute little bunny rolls in a children’s magazine that our church publishes.  She literally was jumping and down with excitement about them and insisted that I make them for the blog as soon as possible.  My six-year-old chimed in that I would probably be the first person on my Facebook to make them.  After I stopped giggling at my kids’ remarkably effective tactics at getting me to make a fun recipe, I decided to go ahead and give them a try.  Smile 

Not too surprisingly, these were quite a hit….with the kids and the adults!  I loved the subtle orange flavoring of these rolls and  the glaze added just a touch of sweetness that made them all the more fun for the kids, but without overpowering them with too much sugar.  It was only on a whim that I decided to try to make the faces using a container of ice cream sprinkles, but since those rolls were the first ones that got gobbled up by my little ones, I definitely think that they’re worth the trouble to add ( on at least a few of them)!    

These cute little bunny buns (or should I call them “rabbit rolls”?) have just become a fun new Easter tradition at our house! 


Click here for printable recipe.


The ingredients:

BUNNY BUNS:

1 Tbs. active dry yeast
1/4 cup warm water
1 cup milk
1/3 cup sugar
1/2 cup oil
1 tsp. salt
2 eggs, beaten
1/4 cup orange juice (I just used the juice from the oranges that I zested for the peel)
2 Tbs. grated orange peel (it took about 2 small/medium oranges)
5-1/2 cups flour ( I used half white, half white whole wheat)
Ice cream sprinkles
(optional for making faces)


GLAZE:

2 cups powdered sugar
2 Tbs. hot water
2 Tbs. orange juice (or 2 more tablespoons hot water for a plain glaze)
1 tsp. butter


Directions:
  In a medium sized bowl, combine the yeast and the warm water.  Set aside.  In another bowl, heat milk in microwave for about 1 minute 20 seconds or so.  Milk should be hot, but not boiling.  Blend hot milk with sugar, oil, and salt. (NOTE:  Before adding the next ingredients, make sure your milk mixture is  warm to the touch, but not too hot to leave your finger in for a few seconds (110-120 degrees is perfect)).   Then add eggs, yeast with water, orange juice, and orange peel.  Add flour a few cups at a time to make a soft dough.  Knead for 5-10 minutes ( I let my Kitchen-Aid do the hard work for me).  Place dough in a lightly greased bowl, turning once to grease surface.  Cover bowl and place in a warm place.  Allow the dough to rise for 1-2 hours, or until double in size.  Punch dough down and let stand for 10 minutes.

On a lightly floured surface, roll dough into a long rectangle 1/2-inch thick.  Cut dough into strips 1/2-inch wide and 14-inches long.  

Roll the dough to make rounded snake shapes.  Reserve 1-2 of the strips to cut into pieces about 1/2-inch long and roll into small balls (for the tails). 


Place one long piece of dough on a greased cookie sheet.  Place one end of the strip over the other to make a loop; bring the end that is underneath up and cross it over the other end.  Place a ball of dough on top of the bottom loop (to be the tail). 

(NOTE:  If you would like to make faces, now is the time.  Make an egg wash with one egg white and one tablespoon of warm water.   Brush over the tops of the bunny buns.   Using a combination of sprinkles, raisins, or whatever,  make a little face at the base of the "ears".  Proceed as directed.)

Cover bunnies and allow to rise in a warm place for 45-60 minutes, until nearly double in size.  Bake at 375 degrees for 12-15 minutes.  

(You can see that we made most of our bunny buns without faces.  They’re not quite as cute, but they were much easier to make and the kids loved them anyway!)

For the glaze, stir powdered sugar, water, orange juice, and butter together.  Frost bunnies with the glaze while still warm.  Makes about 20 bunny buns.  

Enjoy!

Cooking with Kids (Halloween): Halloween-y Cake Balls


Cake balls are a new found indulgence of mine. They're tasty, sophisticated, fun, and truly simple to make. I personally like the flavor of the Oreo truffle balls even better, but these are slightly less sweet and have the color and the cool factor going for them! My kids had a blast making these with me and are now begging to make them for every holiday. The only problem I see with these is how addictive they are!

The ingredients:


1 box Duncan Hines Red Velvet cake mix, baked as per package directions
1 jar Duncan Hines frosting, cream cheese or vanilla (or an 8-oz. pkg. of cream cheese)
Melting chocolate in various colors (I got mine from the craft store) OR white chocolate chips
Decorating gels, black, green
3-4 Tbs. Crisco
lollipop sticks (from the craft store)

Bake the red velvet cake as per directions on box. Allow to completely cool.

When cake is cooled, use your fingers or fork to crumble the cake until it is nothing but fine crumbs. My children happen to think that crumbling the cake is a job that is particularly humorous and exciting.

When cake is crumbled, combine the entire jar of frosting with the entire crumbled cake.

Mix until cake and frosting cling together.

Now using your best cookie dough skills, form the cake/frosting mix into 1-inch balls and place on wax paper.

(Kids also really like this job). When balls are all formed, place in freezer for 1-2 hours (or more). You could technically skip the freezing, but unfrozen cake balls are VERY difficult to work with and tend to fall apart very easily while dipping. I highly recommend being patient and freezing them.

When cake balls are frozen and you're ready to start dipping, put 1 cup of melting chocolate (or chocolate chips) in a microwaveable bowl and add 1-1/2 teaspoons of Crisco. **The Crisco makes the consistency of the melted chocolate easier to work with and decreases the setting time significantly.**

Place in microwave for 90 seconds, stopping it every 30 seconds to stir well. Your chocolate should now look like this.

Now on to the fun part.

Stick a lollipop stick in each ball (another good kid job), then immerse completely into the melted chocolate. Use a spoon to help to evenly distribute the chocolate over the entire ball.

My kids also liked helping with this step, but they may need a little more supervision, especially in making sure the entire cake ball is evenly covered.

After dipping, set the wet cake ball lollipops gently onto a piece of wax paper and allow to set before moving.

After the chocolate has set, use the decorating gels and decorate as desired. The gel will eventually harden, but it will take a few hours.


Ellie was very proud of her ghost with hair!

Enjoy!