Showing posts with label Tasty Tuesday. Show all posts

Sweet and Sour Pork (updated)


I know I've mentioned before that my mom used to bake goodies for a craft sale she put on with two of her good friends (they had 50 crafters at their sale!!). One treat she made was pepper jelly.


If you've never had pepper jelly... I urge you to give it a try. It's quite delicious, especially on a cracker with a little bit of cream cheese!!

This fall, my mom made her batch of pepper jelly, but somehow crystals formed in the jar :( Never fear, her ingenuity led her to a great new meal... sweet and sour pork!


Sweet and Sour Pork - Mom

1 pork roast, 4-5 pounds
1 jar (about 6-8oz) pepper jelly
1 jar (small) chili sauce
1 medium onion, sliced

Slice the onions and layer them across the bottom of your crockpot. Set the roast on top of the onions (this helps prevent the meat from sticking to the bottom of your crockpot).

Then, pour the pepper jelly and chili sauce over the roast.


Cover and cook on low for 8-10 hours, until the internal temperature of the pork reaches the proper temperature.


Serve over rice, and use the juice as a glaze.


Delicious.


And, way better than eating out!

Linked to:

Apple Cranberry Granola

Do you still need a gift for some family or friends?  This delicious granola is easy to make and a wonderful gift to share with friends. 


You can enjoy the granola over ice cream, with milk or yogurt for breakfast, or dry as a snack to tide you over until dinner :)   

Apple Cranberry Granola - SnoWhite

~6 C Apple Granola
1 dried apple (or apple chips)
1 C Craisins


Break apart dried apples into bite-sized pieces.


Toss cranberries with the apples.


Then, add apple granola.


Stir the mix together.


Store in an airtight container... or, if desired, scoop 2 C of the mix into 4 gift bags. 


Aren't they cute?!


This post in linked to:

Honey Wheat Bagels

Every once and a while, a good bagel, toasted with cherry preserve is a wonderful breakfast. This morning, we decided to try whole wheat bagels.


This recipe is so easy! It's just a little time consuming -- about 2 hours from start to finish. But, it's worth it. Simple ingredients and a yummy result = a breakfast we enjoy!

Honey Wheat Bagels - From Laura @ Heavenly Homemakers

4 C whole wheat flour
2 1/4 tsp. yeast
1 1/2 C warm water
3 T honey + 1 T honey
1 tsp. sea salt


Combine 2 C flour, salt and yeast in a large bowl.


Then, add warm water.


Lightly spray your T with cooking spray, then add the 3 T of honey. If you spray your spoon first, the honey slides right off :) That's my kitchen tip!


Stir to combine, and stir in the remaining 2 C wheat flour.


Knead for ~10 minutes; then cover and allow the dough to rest for 10 minutes.

Meanwhile, bring a large stock pot of water to boil. Add in 1 T honey to boiling water.

Divide the dough into 12-16 pieces (depending on how large you want your bagels).

Create a hole in the center and shape into a bagel.

Let the bagels rest on a greased cookie sheet for 15ish minutes.


While the bagels rest, turn your oven on to broil.

Broil the bagels for 2 min/side.


When the bagels are broiled, place the bagels (about 4 at a time) into the big stockpot.


Boil them for 7 minutes; turning once about half way through.

Drain the bagels on a towel.


Then, bake at 375 for 25-30 minutes until lightly brown.


Allow them to cool just a little bit -- then enjoy.


You can freeze the ones that don't get eaten; they toast very nicely from the freezer.

These also make wonderful sandwiches for lunch -- a nice change from standard bread.

This post is linked to:

Roasted Butternut Squash Lasagna


This was a fantastic lasagna!  Garlic (lots of it), and butternut squash were in the original recipe, and I added in spinach to compliment the flavors and add some color (not to mention some good-for-you by products).  Our guests said they enjoyed it more than "regular" lasagna. I think the combination of flavors makes this roasted butternut squash lasagna one for the family recipe book.

Roasted Butternut Squash Lasagna - Given to me by my friend, Bird, & adapted from AllRecipes

1 1/2 lb. butternut squash
1 T olive oil
1/4 tsp. salt

1 T butter
2 T minced garlic
2 T flour (I used white whole wheat)
2 C milk
salt and pepper, to taste
1/2 C whipping cream
1 pkg. frozen spinach
4-6 lasagna noodles
2/3 C Parmesan cheese

Cut the squash in half, scoop out the seeds, drizzle lightly with olive oil and sprinkle with salt.  Roast at 450 for about 45 minutes, until soft when pricked with a fork. 


Allow the squash to cool for about 20 minutes, and then scoop out the squash into a large bowl. I had about 3 loosely packed cups of squash.


Smash the squash well, so the large pieces are eliminated.

Heat butter in a skillet, cook and stir in garlic until softened and the garlic smells great!


Add in flour (again, I used white whole wheat), and then continue cooking for about 3 minutes.


Add in the milk -- whisk until smooth. I added the milk little bits at a time, and stirred until smooth.


Bring to a simmer, and cook until the mixture thickens -- about 10 minutes.  Stir in the squash (this would be great with leftover squash too!) and season with salt and pepper, to taste. 


Grease a 3-quart baking dish (or, double the recipe and make a 9x13 baking dish).  And, preheat the oven to 375.

Beat the whipping cream until foamy and add in a little salt until peaks form. Then, set aside.


Pour 1/2 C of the butternut squash sauce into the baking dish and place lasagna noodles over the top in a single layer. 


Spread half of the sauce over the noodles, half of the spinach, and sprinkle with one third of the Parmesan cheese.


Place another layer of noodles on top, the remaining sauce, the remaining spinach, and one third of the Parmesan cheese.  Place the final layer of noodles over the top.


Pour the whipped cream over the top of the lasagna.  Make sure all those noodles are covered. 


Then, sprinkle with the remaining third of the Parmesan cheese.     


Cover with foil (I just used the cover to my casserole dish), and bake at 375 for 30 minutes.  Then, remove the foil and bake until the top is bubbly and brown, about 10 more minutes.  Allow to rest for 10 minutes before serving.
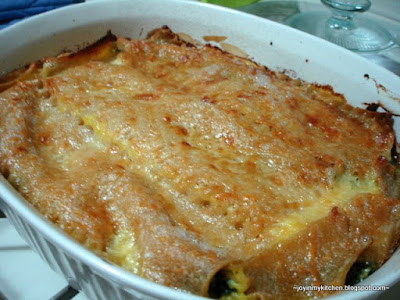


Enjoy paired with a yummy garlic bread!


It was so tasty, despite the strange aspect of pouring whipping cream over the top! Hope you enjoy it.

This post is linked to:

Sweet Potato Pie


I love pumpkin pie.  But, I love my hubby more.  Seeing as he's allergic to pumpkin, we don't eat it in our house, and I haven't had a slice of it in ... too long.


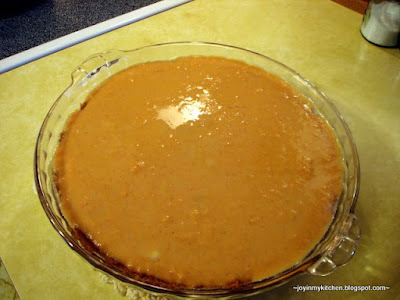
This year, I tried a new pie -- Sweet Potato Pie -- and I love it.  I love it because it reminds me of pumpkin, but is more robust than pumpkin pie.  I love it because it's healthy -- sweet potatoes are good for you, you know.  I love it because my hubby can eat it too.  I love it because it has a yummy crust.  The crust is made from whole wheat molasses crinkles.... possibly the best crust ever.

For our first attempt, we used crushed cookies to make the pie crust.  After the pie was in the oven, I got to thinking that I should make the crust with the dough from the cookies, which would reduce the use of butter to get the cookies to stick together and form a crust.  I haven't actually tried this yet, but you can find my thoughts on how to do it under the * at the bottom of this post.    

Sweet Potato Pie with Molasses Crinkle Crust - SnoWhite

Crust
~8 large molasses crinkles*
1-3 T butter

Filling
1 can (12oz) evaporated milk
2 C sweet potato puree
1/2 C packed brown sugar
2 eggs
2 tsp. ginger
1 tsp. pumpkin pie spice
1/4 tsp. salt

Preheat oven to 350.

Crumble cookies into a medium sized bowl, and mix in butter until the cookies easily stick together.


Press into a pie plate. Be sure to get a little cookie up the side (mine could have gone up higher).


Pre-bake the crust just a little (this becomes especially important if you are using raw cookie dough to make the crust); about 10 minutes until lightly browned.


Meanwhile, combine the filling ingredients in a bowl.


Mix well.


Pour into the pre-baked crust. (and, now, turn up your oven to 425)


Place pie on a cookie sheet in the oven heated to 425.

Bake the pie for 15 minutes at 425, and then reduce the heat to 350.
Continue baking for about 45-50 minutes more.


Pie is done when the center is set (you can check this by cutting into the center of the pie).

Allow the pie to cool before serving.


Pie is best eaten within 2-3 days of making. :) But, it won't last that long.


*You can also use about 1/2-1 C dough pressed into an 8-inch pie plate to form a crust.  Pre-bake the crust for about 8-10 minutes, before adding the topping.

This post is linked to: