Showing posts with label yogurt. Show all posts

Berry Frozen Yogurt {w/o ice cream maker!}

For those of you without an ice cream maker -- this recipe is for you!


I've been in a smoothie making mood lately, and this recipe was born out of my inability to finish an entire smoothie in one sitting.  When I make a smoothie, I make enough for two servings -- sometimes Frog Prince enjoys his half, and other times, he'd rather have a cup of tea.


I poured half of the berry smoothie into our ice cream storage containers and set it in the freezer.  In a matter of 3-4 hours in the freezer, I had our own creamy version of frozen yogurt made without an ice cream maker!


Now, when I make a berry smoothie, I enjoy half right away and freeze the other half.  Then, I'll pop that frozen half in my lunch box and take it with me to my office and stick it in the fridge.  In time for a mid-morning snack the smoothie is now partially thawed and makes a great bowl of frozen yogurt I can enjoy in my office.  This really works well for me as it switches things up in my lunch and it's an easy way to increase the fruits I eat each day.


Berry Frozen Yogurt

Storage container
Freezer

Prepare the berry smoothie according to directions. 


Pour the smoothie into a freezer-proof storage container.  


Freeze for 3-4 hours.  

Before serving, remove from the freezer and allow the frozen yogurt to thaw a bit.  Alternatively, remove from the freezer and place in the fridge for 3-6 hours before serving.  


Enjoy your homemade frozen yogurt without using an ice cream maker!

Linked to: Tasty Tuesdays, Totally Tasty Tuesdays, Slightly Indulgent Tuesday, Tempt My Tummy Tuesday, Kitchen Tip Tuesday

Berry Smoothie


With the weather getting nicer, I've been getting back into my habit of walking to work. This smoothie makes an excellent walking companion.


One recipe fits perfectly in my travel mug. But, it looks prettier in the glass.


Berry Smoothie
{Makes 1 smoothie}

1 container of homemade Greek yogurt {~6oz}
1 C frozen fruit {I used blueberries, raspberries and strawberries}

Combine the yogurt and frozen fruit in your blender.


Blend until smooth.


Pour into a glass or insulated mug and serve.


What I love about this smoothie is that it uses protein packed Greek yogurt {we use homemade}, which has a thicker consistency than regular yogurt.  This means I can eliminate the need for a banana in my smoothie.  This is great because (a) bananas make my mouth itch (oral allergy syndrom), and (b) bananas tend to over-power the other flavors.  This smoothie has a delicious berry flavor, and the frozen berries give a nice texture to the smoothie.


Enjoy!


Photobucket

Linked to: Ingredient Spotlight,

Raspberry Frozen Yogurt


Yesterday, I shared our recipe for homemade yogurt.


If we're being completely honest, 90% of the reason I wanted to get into making our own yogurt was so that we could make our own frozen yogurt :)


Don't get me wrong, this girl loves her yogurt. But, when it comes down to it -- frozen yogurt wins every. single. time.


Raspberry Frozen Yogurt - Inspired by Lucy

2 C plain, unsweetened yogurt
3 C raspberries (I used frozen)
3/4 C sugar (or 1/2 C honey)
1/2 C milk

Begin by blending together the yogurt, sugar and milk.


Puree the berries, along with a little bit of milk/yogurt mixture, if needed. My frozen berries pureed much better once I added a bit of the yogurt.


Then, stir the berry mixture into the remaining yogurt mixture. Blend well.


If desired, strain out the seeds.  I didn't, but if seeds bother you in the smooth consistency of frozen yogurt, then I recommend straining the puree before continuing.


Assemble your ice cream maker according to directions, and then pour in the yogurt fruit mixture.


Allow the yogurt to freeze up for about 20 minutes in the maker.  Then, pour into a freezer-safe container.  Allow the frozen yogurt to set up in the freezer for about 30 minutes.  Then, enjoy!


Photobucket

Linked to: Recipe Swap Thursday, Full Plate Thursday, It's a Keeper, URS, What's Cooking Thursday, Family Friendly Fridays, Sweets for a Saturday, Sweet Tooth Friday,  Slightly Indulgent Tuesday

Raspberry Swirl Coffee Cake

This beautiful coffee cake was a tasty way to start a cold winter's morning.  I got the recipe from an old Simple and Delicious magazine where the submitter bragged that it had won the "Best of Show" ribbon at her local fair.  With its raspberry swirls and unique yogurty flavor, it won best of show at our house too!   NOTE:  I've had a couple people ask about using other flavors of yogurt and preserves and while I've never tried it, I think it would be absolutely delicious.  We're trying it later this week with blueberry yogurt and preserves. 

Click here for printable recipe.


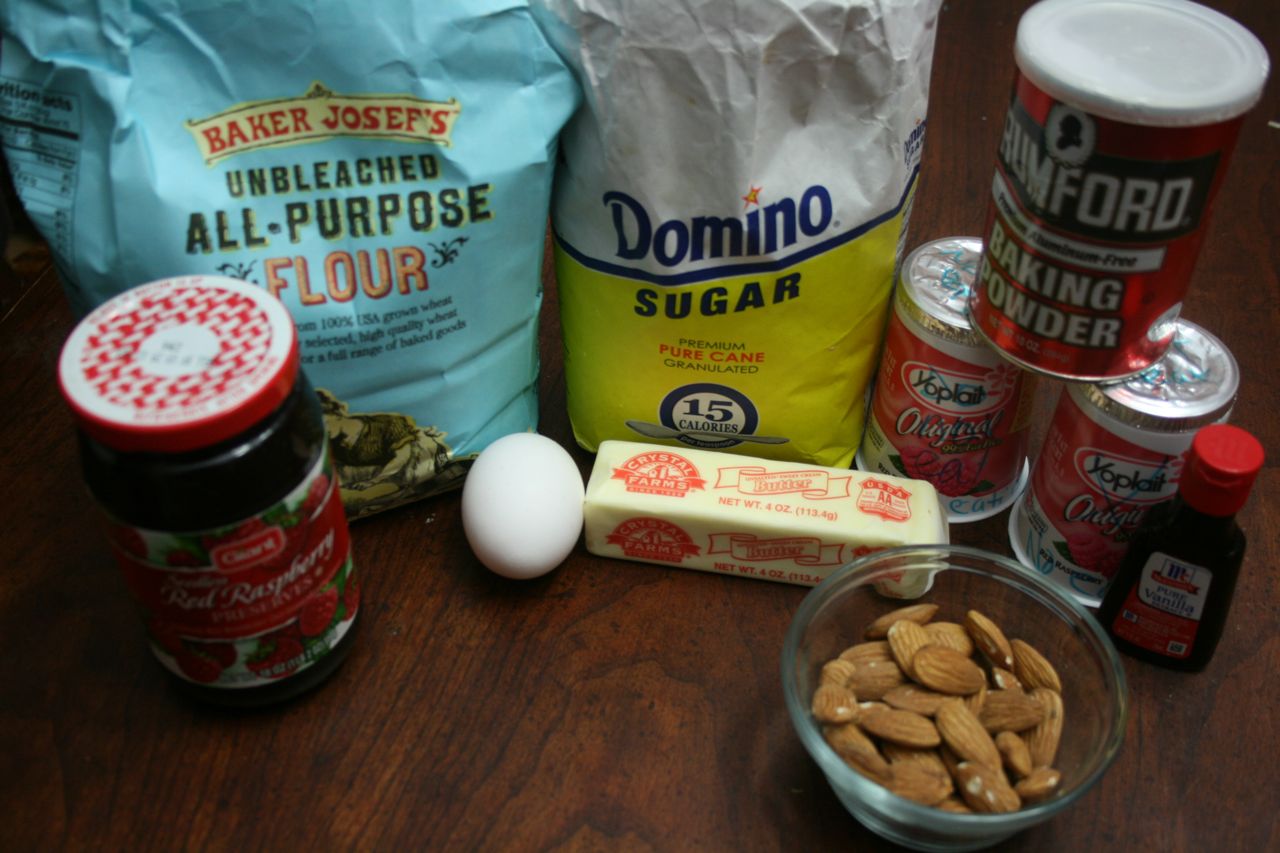
The ingredients:

2 cups all-purpose flour
3/4 cup sugar
2 tsp. baking powder
1/2 tsp. salt
1 egg
1 cup (8-ounces) raspberry yogurt ( I used Yoplait 99% fat-free original yogurt)
1/2 cup butter, melted
1 tsp. vanilla extract
1/2 cup chopped almonds, toasted (optional)
1/2 cup seedless raspberry preserves, divided
2 Tbs. sliced almonds, toasted (oops, we forgot to do this)

Directions: 
In a large bowl, combine the flour, sugar, baking powder, and salt.  In another bowl, whisk the egg, yogurt, butter, and vanilla until blended; stir in dry ingredients just until moistened.  Stir in the chopped almonds.  (batter will be thick)

Pour into a greased 9-inch springform pan (or just regular 9-inch round cake pan). 

Drop 1/3 cup preserves by tablespoonfuls over batter; cut through with a knife to swirl. 

Sprinkle with sliced almonds (we forgot this step).  Bake at 350° for 40-45 minutes or until a toothpick inserted near the center comes out clean.

Cool on a wire rack for 10 minutes, then remove sides of the pan if a springform pan was used. 

In a small saucepan, heat remaining preserves until melted; drizzle over serving plates.  Top each with a piece of coffee cake.  (we also skipped this, since I did not care about making it pretty for my kids).  Makes 10 servings. 


Enjoy!


I’m linking up with Cheryl at Tidy Mom for “I’m Lovin’ It Friday”,
and with Kim at Quit Eating Out for her “Saturday Swap”.
Please check them out!!


Labna (yogurt cheese)

Labna (yogurt cheese) / Labne

Do you remember my homemade ricotta? That recipe is wonderful – I’ve received comments and emails from many of you who have tried it too, with great results. I have made it dozens of times already and used it in both savory and sweet dishes. I thought it was about time I tried another recipe from Donna Hay’s cheese making spread (issue 35), especially after seeing the wonderful cheeses my friend Ana Elisa has been making lately.

If you liked the ricotta, you’re gonna love the labna: it’s even easier to make – no cooking involved, no need for a thermometer – and tasted really good. I highly recommend it.


Labna (yogurt cheese) / Labne


Labna (yogurt cheese)
  • 2 cups (520g) plain, full fat yogurt
  • 1 teaspoon sea salt flakes
  • olive oil to cover
  • ¼ cup fresh oregano leaves
  • ½ teaspoon black peppercorns

Place the yogurt and salt in a bowl and stir to combine. Line a sieve with fine muslin and place over a deep bowl – the bottom of the sieve should not be in contact with the liquid released from the yogurt. Pour the yogurt mixture into the sieve. Cover, set aside in the refrigerator and allow to drain for 5 days, removing the liquid every once in a while.

Roll 2 teaspoonfuls of the mixture into balls and place in an airtight jar. Repeat with the remaining mixture. Add the oregano and peppercorns and cover with oil*. Store the labna in the refrigerator for up to 1 week.

* the olive oil coating may solidify in the refrigerator so allow the labna to return to room temperature before you serve it.

Serves 4


Labna (yogurt cheese) / Labne

Banana and dried cranberry tea cake

Banana and dried cranberry tea cake / Bolo de banana com cranberries


I know, I know... Another banana post in less than a month – please bear with me and my full-of-bananas-freezer. :D

This recipe comes from a book a bought several months ago but only recently became addicted to – and with a whole chapter devoted to bananas, I’ll be using it again soon. :D


Banana and dried cranberry tea cake / Bolo de banana com cranberries


Banana and dried cranberry tea cake
  • 2 cups (280g) all purpose flour
  • 1 ¼ teaspoons baking powder
  • ½ teaspoon baking soda
  • ½ teaspoon salt
  • ½ teaspoon freshly ground nutmeg
  • ½ teaspoon ground cinnamon
  • ¾ cup (83g) dried cranberries, coarsely chopped if too large
  • 8 tablespoons (113g/1 stick) unsalted butter, softened
  • 2 tablespoons (28g) shortening, room temperature
  • 1 cup (200g) granulated sugar
  • 2 large eggs
  • 2 teaspoons vanilla extract
  • 1 1/3 cups mashed ripe bananas blended with ¼ cup sour cream – I used yogurt

Preheat the oven to 190°C/375°F. Butter the insides of a 22.5x12.5x7.5cm (9x5x3in) loaf pan* and dust with flour, tapping out the excess.

Sift the flour, baking powder, baking soda, salt, nutmeg and cinnamon onto a medium bowl. In a small bowl, toss the cranberries with 1 teaspoon of the sifted mixture.

Cream butter and shortening in the large bowl of an electric mixer on moderate speed for 2 minutes. Add the granulated sugar and beat for 2 minutes longer. Beat in the eggs, one at a time, blending well after each addition. Blend in the vanilla. Scrape down the sides of the mixing bowl frequently with a rubber spatula to keep the batter even-textured.

On low speed, alternately add the sifted mixture in three additions, with the mashed bananas-sour cream blend in two additions, beginning and ending with the sifted ingredients. Stir in the cranberries. Spoon the batter into the prepared pan, mounding it slightly in the center.

Bake the tea cake for 55 minutes or until risen, set and golden and a wooden pick inserted in the center of the loaf comes out clean or with a few moist crumbs attached to it. Cool the loaf in the pan on a rack for 5 minutes, unmold it onto another rack and cool completely – turn the cake so the top is upwards. Dust with icing sugar.
Let the tea cake mellow for at least 2 hour before slicing it.
Store in an airtight container for up to 5 days.

* I halved the recipe, used a 8x19x5cm loaf pan and baked the cake for 30 minutes

Makes about 12 slices