Showing posts with label Sides. Show all posts

Grilled Potato Fries


During the summer months, we love to grill.  Turkey burgers are a real treat for us, and we love to serve these with fries.


These grilled potato fries are amazing.  Crunchy on the outside, chewy on the inside and perfectly seasoned with the "I just came off the grill" taste.


Plus, there's no need to heat up your oven during those hot summer months!  All you need is a grill basket or grill sheet you can place on the grates of your grill to make these potato fries.


Grilled Potato Fries

1 medium russet potato/person
~1 tsp. olive oil/person
sea salt, to taste
black pepper, to taste

Begin by washing and peeling (if desired) your potatoes.  Slice them into wedges that are fairly thin and, more importantly, a relatively even thickness.

Place the wedges into HOT water and allow the potato slices to sit in the hot water for 15 minutes.


Drain the water off of the potato wedges and pat dry the potatoes with a paper towel.


Toss the potato wedges in a large bowl with olive oil, sea salt and pepper.


Lay the wedges out into the grill basket, or along the grilling plate. {Please excuse the zucchini... unless you like zucchini fries -- then use zucchini in the mix too, however, you don't need to soak them in hot water; otherwise, follow the directions for zucchini fries too!}.


Place the grill basket on the grill, and grill over medium heat for ~20 minutes.  Watch the potato fries closely, and flip them over about every 5 minutes.  Be sure to use a hot mit if you are going to pick up the hot basket or grilling plate.


Keep the potato fries on the grill until ready to serve because they do cool off very quickly.


Enjoy a delicious, grilled potato fry!

Crockpot Baked Beans

With all the heat fired up across the country, grilling is probably the preferred way enjoy dinner without heating up the kitchen.  However, that poses a problem... what to serve with the grilled goodies that doesn't heat up the kitchen?  Try these crockpot baked beans.


What I love about this recipe - it doesn't rely on canned baked beans.  Instead, it uses basic ingredients to make a delicious baked bean.


Crockpot Baked Beans - Adapted from Eat at Home


4 cans white beans {pinto, navy beans}
1/3 C molasses
1/3 C brown sugar
1 tsp. dry mustard
2 T minced onion
2 T bacon bits
1/4 C ketchup
2 T apple cider vinegar

Rinse and drain the beans.  Place them into a lightly greased crockpot.


Add the onions and bacon bits.


Stir in the vinegar, mustard, ketchup, molasses and brown sugar.


Cover. Cook on low for 3-4 hours.


Stir occasionally during the cooking process.


Serve warm!

Fruit Kabobs


For Easter, my mom made us a special treat -- fruit kabobs that you self assemble from this adorable watermelon fruit basket!  


It was a fun afternoon treat to enjoy the skewers filled with a variety of fresh fruit.  Something different for a change -- would be a hit at a party or even for a fun snack with kids (or adults who happen to be big kids).  

Fruit Kabobs

Pineapple
Kiwi
Grapes
Cantaloup balls
Strawberry
Watermelon
Other fruit as desired
Wooden skewers

Dice all the fruit into large 1-2 inch cubes.  Strawberries and grapes likely don't need any other prep than to be taken off of the stems and for strawberries, removing the tops.  


Place all the fruit in a large bowl.  If desired, carve out a basket from a personal-sized watermelon.  Then, allow each person to build their own kabob.  


Serve fresh and enjoy!


Homemade Tater Tots


Until November, Frog Prince had never had tater tot hotdish.


Hey, cut him some slack.  He's not native to the land of the frozen tundra.

But, he did taste tater tot hotdish at a church potluck {where else, right?!} and ever since then, he's been asking me to make it.

But, with one caveat - it needed to have homemade tater tots.


Sheesh.


It's a good thing I love the boy.

Today, I'll share with you the failure(s) and success of making homemade tater tots.  Come back tomorrow, and I'll share the coveted tater tot hotdish recipes, Finding Joy in My Kitchen style (that is, completely from scratch).


First - what not to do:

1) Do not deep fry tater tots.  They will dissolve.  And, send oil splattering.  And, make strange popping sounds.


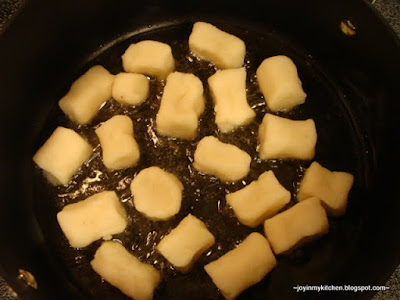
2) Do not fry tater tots in the pan. It might look like a good idea to start... but it's not.  They will flatten to pancakes.


And, absorb all the oil.  Yuck.


3) Do not beer bater tater tots.  You don't want to go there.  Trust me.  They taste great, but not like tater tots.


What can you do?  You can bake them.  And, they are mighty tasty, mind you.

Here's your tater tots, Frog Prince.


Homemade Tater Tots - Finding Joy in My Kitchen

8 medium potatoes
2 tsp. salt
1 T flour
dash of pepper
1/2 C corn flakes, crushed.

Begin by peeling and slicing the potatoes into quarters.  Place potatoes in salted water and bring them to a boil.  Boil until tender.


Drain potatoes and allow them to cool a bit (so that you can handle them without a problem).  Don't let them get too cool; it's important they are still warm.


Using a potato ricer, rice the potatoes!  {that was fun}


What, you don't have a potato ricer? Try your mom, grandma or neighbor -- they might have you one can use.  I found this old one in my mom's kitchen.  The goal of the ricer is to get the potatoes really fine (without adding milk).


Stir in the flour, 1-2 tsp. of salt (taste to make sure you've gotten them to the saltiness you like) and pepper.  Yes, you'll lose the pretty ricing, but that's okay.


Then, shape the taters into tots.  Even the kids will have fun with this step.


Set them on a cookie sheet as you go.

Next, roll them into the crushed corn flakes.  If they don't stick, you can use some milk or an egg white brushed on the potatoes.  Mine stuck just fine, but I did them while the potatoes were still warm and pliable.


Bake the tater tots at 400 for 15 minutes, until browned.

Then, remove and allow them to cool.  You can eat the right away, or freeze them.  I stuck ours in a ziplock bag and stuck them in our freezer until ready to use.

Enjoy!


Photobucket

This post is linked to: Show and Tell, Look What I Made, Make it Yours DayWhatever Goes Wednesday, Recipe Swap, Cooking Thursday, Full Plate Thursday, Strut Your Stuff, Show off Your Stuff and Family Friendly Fridays

Crockpot Baked Potatoes


These are the best baked potatoes I've ever had.  They are delightfully moist, soft and have a yummy skin.    


Not to mention they're made in the best kitchen appliance ever -- your crockpot!  Did you know that cooking in your crockpot is the most energy efficient way to cook?!  The crockpot is the least energy-consuming appliance you have, and is much better than our hummer-mimicking ovens.  

Knowing I can save energy and have a great tasting potato at the same time means I don't think I'll be going back to cooking potatoes in the oven any time soon!!


Crockpot Baked Potatoes - From Around My Family Table
{Print Recipe}

4-5 russet potatoes
1/2 T - 1 T olive oil
Sea Salt

Scrub potatoes well and pat dry.

Spray the crockpot with olive oil cooking spray.

Then, lightly coat each potato with olive oil.

Arrange the potatoes in the crockpot.


Sprinkle with sea salt.

Cover and cook on high for 4 hours, rotating potatoes a couple of times during cooking to make sure that all potatoes come into contact with the crockpot sides/bottom for a portion of the cook time.


Serve warm with desired toppings --


we love broccoli, cheese and a few bacon bits!


Photobucket

This post is linked to: