Showing posts with label candy. Show all posts

Holiday Baking #31: Chocolate Mint Sandwiches (Homemade Andes Mints)

If you haven't noticed by now, I definitely have a thing for the chocolate--mint flavor combination.  From my favorite mint-brownies, to my daughter's chocolate-peppermint cake roll, to our peppermint patty brownies, I pretty much consider it one of my favorite flavor combinations ever.  I partially attribute this love to the fact that I'm a bit of a culinary rebel of sorts.  My mother has despised mint her whole life, which meant that I was pretty deprived of it in my youth.  Now I'm all grown up and I like to make sure that we have something minty in our repertoire as often as possible (except of course when mom is coming to visit).  :)  

Okay, okay...enough of my ramblings...here is the final installment of  Jenny's three chocolate-mint holiday treats!   These would be another great addition to a plate of goodies or for a holiday party snack.   See here for her recipe for homemade peppermint patties and here for her peppermint bark.  Thanks to Jenny for inspiring us with your talent for gorgeous and tasty treats!

Make sure you read the notes at the bottom about choosing your chocolates for this recipe.    


By the way, today is supposed to be the last day of my goody-a-day posting, but I have one more special treat waiting for you for tomorrow!  You won't want to miss this beautiful creation!   

Click here for a printable version of the recipe. 


NOTE:  ‘Real’ chocolate can be used in place of chocolate-flavored compound coatings, but the layers
tend to separate and be more difficult to handle than when using compound coatings, and ‘real’
chocolate must be tempered when melted. Regardless of which chocolate you use, you can mix
up the colors and flavorings to make distinctive chocolate sandwiches to your liking.

NOTE:  *When purchasing compound coating, make certain you know what your are buying, as it is
available in many flavors and colors. “Green” can be vanilla, lime, or mint. If buying mint-flavored
green compound coating, DO NOT add the peppermint oil. If buying vanilla-flavored green
compound coating, do add the peppermint oil.

Enjoy!

Holiday Baking #29: Dark Chocolate Pomegranate Clusters

When I told admin about this simple recipe that has become the hit of our holiday season, she asked me to hurry and get it posted before the New Year! These are simple to put together and pack a huge wow factor. The crunch of the chocolate pairs so well with the explosion of pomegranate juice in your mouth – we just couldn’t get enough of them. We also enjoyed taking them to a party and watching people’s faces when they took a bite and were surprised to discover that these were not chocolate covered peanuts! It was pretty funny :)
  
Click here for printable recipe. 

IMG_4118 Ingredients:
1 bag Ghirardelli 60% Cacao Bittersweet Chocolate
1-2 Pomegranates
1-2 Tbsp. Canola Oil

Directions:
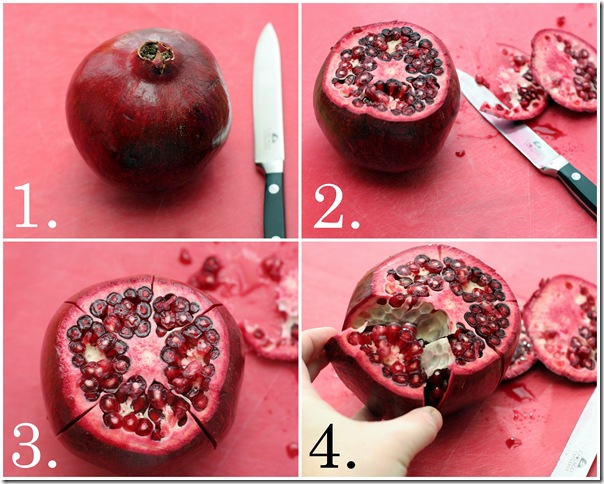
Deseed your pomegranates. Did you know each juicy little seed is called an aril? If you’ve never done it before, here’s a little instruction: In order to keep the most arils intact, slice off the top, then score the skin along the divisions you see from the top. Don’t cut as deeply as I did below – that was too much. Then pull the sections apart and very gently break the arils free. While you’re doing this, feel free to marvel at God’s creations as I do each time.
2010-13

(Or if you don't mind spending a little more money, then try this super easy alternative to deseeding your own pomegranate.  Fresh pomegranate arils, also found in the produce section.  I don't know if there are other brands, but Pom Wonderful arils are almost as fresh and lovely  as if you'd just barely deseeded your own fresh pomegranate. )

You won’t want to introduce any liquid other than the oil into your chocolate, so keep the cut and broken and bruised arils separate from the perfect, fully-contained ones. We’ll only use the perfect ones for this recipe. Once you have them all out, spread them out on a paper towel, and gently roll them around with your fingers to absorb some of the moisture. Change the paper towel a couple of times and allow the arils to sit on the paper towel in a single layer for a while until the juice on the outside has dried.

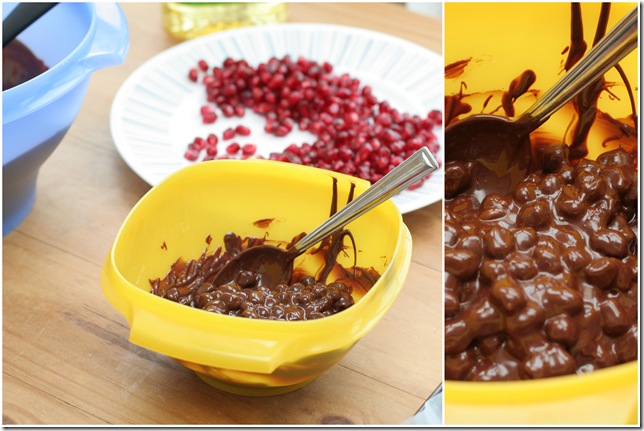
Melt the chocolate according to the directions the back of the bag, using either the microwave or a double boiler on the stove. Add a tablespoon or two of oil during the melting process. It’s ready when the chocolate is smooth, but not yet warm. 

Working in small batches, combine a little chocolate and some pomegranate arils, so it looks like the picture below.
2010-12
Drop by teaspoonful onto a cookie sheet covered with wax paper or parchment. Refrigerate until the chocolate has set. These are best eaten within two or three days. After that, the pomegranate arils will start seeping and they'll ruin the chocolate.
IMG_4133
Enjoy!

****************

Holiday Baking #21: Peanut Brittle

Hi! I'm Clarinda from Tale of Two Sisters and Their Kitchens (feel free to stop by for a visit). I was so excited and honored to have admin invite me to participate in her month of tasty treats! I immediately sifted through my cookbooks and recipes to find something perfect that I could share with all her devoted readers.
One of my favorite treats during the holiday season is Peanut Brittle, and the candy made at home is usually far better than anything bought at the store. I find it relatively simple to make and it only requires a few ingredients - most of which are probably staples in your home. The batch I made in preparing for this post turned out so perfectly divine! It had the perfect brittle consistency (not too chewy, not too hard), and a very buttery, caramely, peanuty flavor. If you try it, I hope it turns out as tasty for you!
Click here for printable recipe. 

Ingredients:

1 cup white sugar
1/2 cup light corn syrup
1/2 cup water
1 cup raw Spanish peanuts
1 T butter or margarine
1 tsp baking soda

Directions:
Grease a large cookie sheet. Set aside.
In a heavy 2 quart saucepan, over medium heat, combine the sugar, corn syrup, and water.
Bring to a boil, stirring until sugar is dissolved. Add raw peanuts.
If using a candy thermometer, set it in place and continue cooking. Stir constantly until temperature reaches 300°F (150°C) or until a small amount of mixture dropped into cold water separates into hard and brittle threads. This is the method I use, since I do not own a candy thermometer. I keep a small dish of cold water on the counter near the stove. Periodically, I drip a little of the mixture into the water to test the consistency.
Remove from heat - immediately stirring in the butter and baking soda. It is helpful to have these pre-measured and ready to go, so they can be stirred in right away.
Pour at once onto the greased cookie sheet. Using the spatula used during stirring, smooth the peanut mixture over the cookie sheet, making sure there are no holes and that it is relatively evenly spread.
Allow to cool. I usually let it cool for at least 30 minutes or so. It should be a nice caramel color and should no longer be sticky.
Break the candy into pieces. I do this by slamming the cookie sheet onto the counter once or twice (this can be quite loud, so you may want to shout out a warning to others who may be around), and then using a fork to break into smaller pieces.
Enjoy the smooth, buttery, crunchy yumminess!


************
Clarinda is a really old friend of mine (back to my high school days)!  I wish I could find a picture of us to post, but that would require digging through all my old photos, so you'll have to just imagine us and our big hair at Girls' Camp. 

Thanks Clarinda!  Peanut brittle is one of those treats I love to enjoy, but have never ventured to make myself.  Your recipe and tutorial look perfect.  Thank you!!!!  

*********
Come back every day through December for a new holiday goody recipe
and don't forget to grab my button and link back to us...


Recipe Shoebox


Holiday Baking #19: Peppermint Bark

Peppermint bark is one of my favorite holiday indulgences and I'm thrilled to share the second of Jenny's three chocolaty and minty holiday treats!   These would be another great addition to a plate of goodies or for a holiday party snack.  I think I'll actually wait until after Christmas this year to make it, just so I can swipe the candy canes off the tree and use those.  :)

The "chocolate-flavored compound coatings" referred to in this recipe are referring to either Almond Bark (readily available at grocery stores and Walmart or Target) or the Wilton's or Mercken's melting chocolates available at most craft stores.  ‘Real’ chocolate can be used in place of chocolate-flavored compound coatings,but the layers tend to separate and be more difficult to handle than when using
compound coatings, and ‘real’ chocolate must be tempered when melted.
 
Click here for printable recipe.

Enjoy! 

***************

Thanks again to Jenny and her candy making expertise!  She should be the brand new momma of a baby boy by now!    :)

Holiday Baking #16: Marshmallowy Christmas Wreaths

Hi, I’m Karey, admin’s sister-in-law and I have a fun, simple, and delicious project to show you today. Kids who like getting messy will be all over this one! I want to call these “Rice Krispie Treat” Christmas Wreaths, but without a single rice krispie to be found, they would be more aptly called Corn Flake Treat Christmas Wreaths, which somehow just isn't quite as catchy! In any case, they are fun, easy, and cute and would be perfect for an allergy friendly treat to bring to a classroom!  Hope you enjoy!
IMG_4046
Click here for printable recipe. 


IMG_4039Ingredients:
8 cups mini marshmallows (about 2 bags)
6 Tbs. butter
green
and yellow food coloring
5 cups corn flakes
PAM Cooking Spray

M&Ms
or red hots for decorating
Directions:
Prepare two cookie sheets, by lining with wax paper or parchment paper, and spraying with PAM, or generously buttering the paper.
Melt marshmallows and butter in the microwave on High power for 1-4 minutes, stirring every minute or so.
Add 15-20 drops of food coloring. The green was a little too bluish for my taste, so I added a few drops of yellow.
IMG_4049
Stir in corn flakes until thoroughly coated.
This is the messy part: Spray your hands with PAM (highly recommended!) or give them generous coat of butter, and then plop handfuls of the corn flake mixture onto the cookie sheets. You’ll need balls that are larger than a golf ball, but smaller than a baseball. Poke a hole in the middle, and stretch to form a wreath. Decorate with candies right away, so they’ll stick. Reapply PAM or butter to your hands, as needed. If the corn flake mixture hardens to the point that you can’t mold it anymore, pop it back in the microwave for 20 seconds or so and it will soften up again.
IMG_4051
Enjoy!


*********
Come back every day through December for a new holiday goody recipe! 
Don't forget to grab my button and link back to us...

Recipe Shoebox


Holiday Baking #15: Peppermint Patties

This post is the first of three delicious peppermint candy recipes from my friend Jenny (read more about Jenny at the bottom).  Each recipe is quick, easy, inexpensive, and perfect to make for holiday gifts to neighbors, teachers, and friends.

But first, a few introductory instructions. . .

KNOW YOUR CHOCOLATE: There are generally 3 different types of chocolate used in home candymaking: 'real' chocolate, compound coating, and chocolate chips.

'Real' chocolate is made from cocoa butter and requires tempering when melted. Tempering is an exacting process that can take up to an hour to do by hand. It involves bringing the chocolate to 3 different temperature points during the melting process so as to create the proper crystal structure at the molecular level. Chocolate that is not properly tempered will dry with a dull finish and gray streaks. Chocolate that is properly tempered will dry with a clear sheen and will have a nice snap to it. 'Real' chocolate can only be flavored with oils (not extracts) and with special chocolate-specific food coloring (which works only on white chocolate). We're keeping it simple with these recipes, so no tempering will be required!

Compound coating is artificial chocolate made from a vegetable oil base rather than from cocoa butter. It melts easily (but can still burn, so be sure to melt slowly over low heat). It is much less temperamental to work with than 'real' chocolate and does not require tempering. Just melt and go. It comes in a wide variety of colors and is most often sold in little disks or buttons. Wilton is the commercial brand of compound coating most widely available, but Wilton-brand compound coating is lower-quality and has an artificial taste.

Mercken's is a mid-end chocolate supplier that offers a higher-quality, better-tasting compound coating. (Mercken's also manufactures 'real' chocolate, so be sure you're getting the right thing). I recommend using Mercken's--widely available through online suppliers--in the recipes featured here.

Chocolate chips often have wax and other additives that interfere with the melting process. Do not use them in the recipes featured here.

Click here for printable recipe. 


*****************************

About Jenny:

Jenny is one of those people who keeps me in awe of her  talent for making things beautiful.  Someday I aspire to make my food and my home half as gorgeous as hers.  :)   And you don't have to take my word for it, take a look at her project blog and you'll see for yourself a glimpse at a few of her many talents.    In real life she also happens to be very thoughtful, generous, kindhearted, and sweet.  Thank you Jenny for taking the time to create these beautiful (and delicious) posts. 


*********
Come back every day through December for a new holiday goody recipe! 
Don't forget to grab my button and link back to us...

Recipe Shoebox


Holiday Baking #11: Butterscotch Fudge

Fudge is one of my favorite treats in the world and every time I have it I think how lucky I am that it's not readily available most of the year, because I'd probably be double my current weight otherwise.  :)   Fudge is usually all about the chocolate for me, but this one from Taste of Home  caught my eye for its unique butterscotch flavor.    It came together quickly and was simple creamy, butterscotchy goodness with a touch of maple.  


For other fudgy yumminess, also see Mom's Peanut Butter Fudge recipe and one of my favorites....Rocky Road Fudge Bars. 


Click here for printable recipe. 


The ingredients:

1 teaspoon, plus 2 tablespoons butter, divided
1-2/3 cups sugar
2/3 cup evaporated milk
1/2 tsp. salt
2 cups miniature marshmallows
1 package (10-11 ounces) butterscotch chips
1/2 cup chopped walnuts
1 tsp. maple flavoring

Directions:  Line an 8-inch square pan with foil and grease the foil with 1 teaspoon butter, set aside. 


In a large saucepan, combine the sugar, milk, salt, and remaining 2 tablespoons butter; cook and stir over medium heat until mixture comes to a boil.  Boil for 5 minutes, stirring constantly. 

Remove from the heat; add the marshmallows, butterscotch chips, nuts, and maple flavoring. 

Stir until marshmallows and chips are melted.  Spoon into prepared pan. 

Let stand until set. 
Using the foil, lift the fudge from the pan; discard the foil.  Cut the fudge into 1-inch squares.  Store the fudge in an airtight container.

Enjoy!

Holiday Baking #9: Easy Chocolate Pretzel Bites

  The hardest part about this super quick and simple, but addicting treat, is unwrapping all those Hershey kisses.  Lucky me though, I have a few kids who are willing to do an amazing amount of work with just the promise of a kiss or two....chocolate kisses that is.  I love the salty-sweet combination on these and I was surprised at how addicting they were.  These pretty little chocolate-pretzel bites would be perfect in a bowl at a party or as a fun lunchbox dessert. 

Click here for printable recipe. 

The ingredients:

1/2 lb. mini pretzels (I used the "Snap" variety, the recipe called for "Rings")
48-50 milk chocolate Hershey Kisses or Hugs or Rolos (NOTE:  Hugs, Kisses, and Rolos have different melting temps, so don't try to do the different varieties in the same batch)
1/4 cup milk chocolate M&M's

Directions:  Place the pretzels on a baking sheet,

then place a chocolate kiss in the center of each pretzel.

Bake at 275 degrees for 2-3 minutes or until the chocolate is softened.  (NOTE:  The Hershey Kisses took the full three minutes in my oven, but the striped Hershey Hugs were done much more quickly and the Rolos took closer to 4 minutes.  I'd check them every thirty seconds or so).  Before fully pulling them out of the oven, push in a test M&M to see if it's melted enough to push down easily. 

Remove from the oven.  Place an M&M candy on each, pressing down slightly so chocolate fills the pretzel.   (the "bite" closest to the camera was my test one and you can see how it wasn't quite ready yet)

Refrigerate for 5-10 minutes or until chocolate is firm.  Store the candies in an airtight container at room temperature. 


Enjoy and try not to eat too many!

*********
Come back every day through December for a new holiday goody recipe! 
Don't forget to grab my button and link back to us...


Recipe Shoebox


Dark chocolate, cinnamon and hazelnut truffles

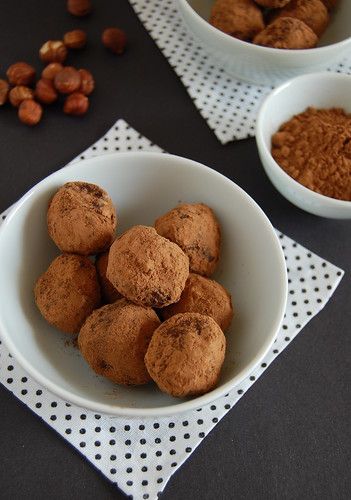
Chocolate, cinnamon and hazelnut truffles / Trufas de chocolate, canela e avelã


A quick look at my sweet recipe index and you'll notice that I don’t make truffles very often – I love working with chocolate, but mostly stick with cookies and cakes. To me, truffles are such a special treat they call for a special occasion as well – like that gorgeous pair of shoes you’ll only wear on your birthday or anniversary. :)

These were made for a special someone, a dear friend of mine who happens to be crazy about shoes, too – let’s just say that her last name could pretty much be Bradshaw. :)


Chocolate, cinnamon and hazelnut truffles / Trufas de chocolate, canela e avelã


Dark chocolate, cinnamon and hazelnut truffles
from DH mag #42
  • 450g dark chocolate (70% cocoa solids), chopped
  • 1 ¼ cups (300ml) heavy cream
  • 1 teaspoon ground cinnamon
  • 40 hazelnuts, roasted*
  • 1 cup (90g) cocoa powder

Place the chocolate, cream and cinnamon in a saucepan over low heat and stir until melted and smooth. Pour into a lightly buttered 1 liter-capacity dish and set aside to cool to room temperature. Cover with plastic wrap and refrigerate for 4 hours or until firm enough to roll.
Roll teaspoonfuls of the mixture into rough balls. Press a hazelnut into the middle and roll to enclose.
Place the cocoa on a baking tray, place the truffles on the tray and gently shake to coat.

* place the hazelnuts on a baking tray and roast in a preheated 180°C/350°F oven for 5 minutes or until lightly golden. Place the hot hazelnuts in the fold of a tea towel and rub back and forth to remove the skins.

Makes 40 – I halved the recipe and got 25 truffles

Spiced brigadeiros

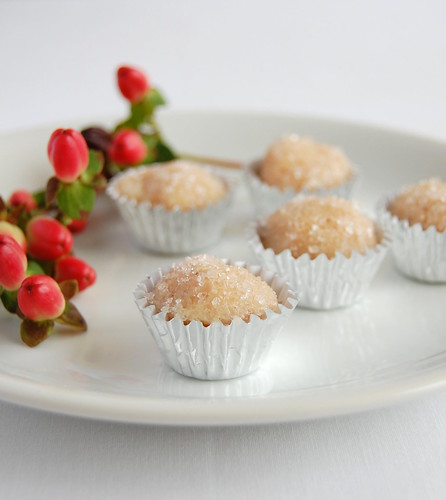
Spiced brigadeiros / Brigadeiros de especiarias

When I was little and heard people saying that “time flies”, I’d usually think “what are these people talking about?” – I guess it only started feeling that way to me after I turned 20. Now my baby sister is a year away from going to college... Well, you get the picture. :D

Holiday season is here again – even though sometimes it seems that Christmas was last month – and my tree is already decorated; time to start thinking about the food.

To me, spices are a synonym of holiday food and I thought that adding them to a Brazilian candy would make a wonderful combination – I was pretty glad with the result, especially after my last squashed brigadeiros. :)

I used Paula’s wonderful brigadeiro recipe as a guide and substituted the chocolate for cinnamon, cloves and nutmeg.


Spiced brigadeiros / Brigadeiros de especiarias


Spiced brigadeiros

  • 1 can (395g) sweetened condensed milk
  • 1/3 cup (80ml) heavy (whipping) cream
  • ½ heaping tablespoon all purpose flour
  • 1 tablespoon unsalted butter + a bit extra for buttering the plate
  • 1/8 teaspoon freshly grated nutmeg
  • 1/8 teaspoon ground cloves
  • ½ teaspoon ground cinnamon
  • granulated sugar, for rolling the candy
Butter a large plate and set aside.
Mix the condensed milk, cream, flour, 1 tablespoon butter, nutmeg, cloves and cinnamon in a saucepan and cook over low heat, stirring constantly, until thickened, about 15 minutes – when the bottom of the pan starts to show and the mixture is a bit thicker, remove from heat and immediately pour into the prepared plate. Set aside to cool completely, then refrigerate to make rolling easier.

Roll small portions of candy into balls (lightly butter your palms to do it), roll through the granulated sugar and place into fluted paper cups.

Makes 32


Spiced brigadeiros / Brigadeiros de especiarias