Showing posts with label Mushrooms. Show all posts

Breakfast Pockets


Frog Prince and I have been on a quest to have breakfasts that are not pancakes/waffles/muffins at least one morning each week.  


This recipe is a hybrid -- it brings together our beloved carbs, and mixes it with yummy veggies, scrambled eggs, and of course, a little cheese.  


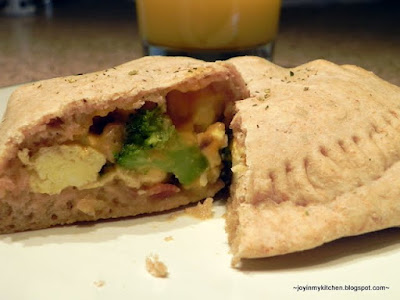
We made a big batch of these up over the weekend, and unlike my pizza pockets, these actually made it into the freezer!  So, we have a quick breakfast pocket in the freezer just waiting for growling tummies in the morning.


Breakfast Pockets
{makes ~10 pockets}

Dough
1 C really warm water
1 tsp. honey
1 T yeast
1 tsp. salt
1 T olive oil
1 1/2 C whole wheat flour
1 C white whole wheat flour

Filling
~1 C shredded cheddar cheese
8 oz. mushrooms
1/2 red bell pepper, finely chopped
1 C broccoli, chopped
4 eggs
1/4 C milk
salt and pepper, as desired
4-6 slices of bacon, cooked 

Begin by preparing the dough.  Dissolve the yeast in the warm water in the bottom of a large bowl (or mixing bowl if you are using your stand mixer).  Allow the yeast and water to sit for about 1 minute.  Then, add in the honey, salt and olive oil.  Stir in the flour.  You can either do this by hand, or with your mixer.  Knead the dough for about 5 minutes until smooth.  Allow the dough to sit, covered for 5 minutes while you prepare your filling.  

Add the sliced veggies to a skillet with a few drops of olive oil.  Saute the veggies until crisp tender.  


While the veggies are cooking, whisk together the 4 eggs and the 1/4 C milk.  Scramble the eggs in a lightly greased skillet until eggs are set.  Season with salt and pepper, to taste.  


Combine the veggie mixture together with the eggs.  Then, crumble up the cooked bacon strips and mix them into the egg veggie filling.  


Now, divide the dough into 10 small balls.  Flatten and roll out those dough balls into dough circles.  Place the dough circles on a lightly greased cookie sheet.  Now is also the time to preheat the oven to 400.  


Divide the topping mixture into proportions equal to the number of pockets you have to fill.  For us, that equated to about 1/2-3/4 C mixture per pocket.  Place the filling on half of the dough pocket.  


Sprinkle each pocket with shredded cheddar cheese.  


Using a pastry brush, spread water around the edges of the dough.  


Fold the dough over the filling and press to seal.  Use a fork to seal the edges tightly.  


If desired, sprinkle the top of the pockets with Italian seasoning, or chives.  


Bake at 400 for 12-14 minutes until pockets are lightly browned and sound hollow when tapped.  


Serve warm.  


If desired, cool the pockets completely.  Then, freeze in plastic freezer bags.  To cook, remove the breakfast pocket from the freezer and microwave for 1-3 minutes (depending on your microwave) until warmed.  


Chicken Spinach & Mushroom Skillet


Mushrooms and spinach are such a delightful pair.  When I saw this chicken and spinach dish from Jenny it immediately made it on our menu.

We absolutely loved this dish -- and we can't wait to make it this summer when we can break out the grill and grill the chicken!!


Chicken Spinach and Mushroom Skillet - Adapted from Love Being in My Southern Kitchen

4 chicken breasts
Montreal Chicken/Steak seasoning
3 C fresh spinach, washed and trimmed
16 oz. fresh mushrooms, sliced
1-2 tsp. olive oil
Shredded cheese (we used Mozzarella, Provolone, Asiago and Parm mix)

Begin by sprinkling the seasoning over the chicken.  We used about 1 T.


Place the chicken into a skillet coated with olive oil.  Cook over medium heat for about 15 minutes, 7 minutes/side, until chicken is close to 180 degrees.  Alternatively, grill the chicken breasts.

When the chicken is almost done, add the mushrooms to the skillet and saute for 2-3 minutes.


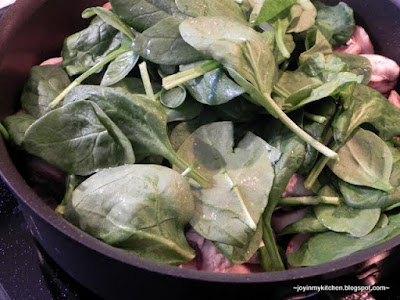
Then, add in the spinach.


Cook these veggies until the liquids from the mushrooms evaporates and the chicken reaches 180 degrees.


Remove the dish from the heat, sprinkle the chicken breasts with cheese.  Cover and allow the cheese to melt.


Serve warm with brown rice and steamed veggies.


Enjoy!


Photobucket

Linked to: Slightly Indulgent Tuesday, Tasty Tuesday (1), Tasty Tuesday (2), Tempt My Tummy Tuesday, Full Plate Thursday, Recipe Round Up, Family Friendly Friday, Fun with Food Friday, Friday Flair.

Roasted Turkey and Veggie Spread


Sandwiches for lunch can get a little boring from time to time, especially when we're limited here to cold-cut sandwiches (no PB and J here!).


This sandwich was a perfect change up on our normal sandwiches.  It reminds me of the filling from our baked veggie sandwiches.  Yum.


In fact, it's so tasty, I recently whipped up another batch - a vegetarian version - to enjoy for my lunches this week while I'm on spring break.  The veggies packed in this sandwich are wonderful, you won't even miss the meat.

Roasted Turkey and Veggie Spread - Inspired by Sweet Treats and More

4 oz. light cream cheese, softened
1/2 C chopped/shredded carrots
4 oz. mushrooms, chopped
1/2 C broccoli, chopped
1 medium red bell pepper, chopped
1 T onion flakes
2 tsp. minced garlic
1 C shredded turkey or chicken (cooked)*
1 T olive oil
Sea Salt, to taste
Pepper, to taste

*Optional.  Omit for a veggie variety.

Begin by chopping the veggies.  I did this by hand... but would use a food processor if I had one!!  Place the veggies on a cookie sheet, or in a glass baking dish.


Drizzle with olive oil, salt and pepper. Stir to combine.


Toss in the turkey, and mix well.


Place the dish in an oven pre-heated to 350 degrees. Roast the veggies for 15-20 minutes, stirring at least once during that cooking time.

Pull the veggie dish out of the oven. Add in the softened cream cheese.


Stir until well coated.


Serve warm, or refrigerate to serve later as a chilled sandwich.


We enjoyed this spread with crackers, atop a slice of bread, and in a "grilled cheese" of sorts, using Havarti cheese!


Photobucket

Linked up to: Recipe Exchange, What's on Your Plate? What's Cooking Wednesday, Tasty Tuesday, Friday Flair

White Bean Italian Pizza


We love using beans in recipes where you wouldn't expect them. Our all-time favorite way to use white beans is in penne with broccoli and sausage, and we love black bean brownies!!


This time, I tried making a white sauce with the beans to use as a quasi-Alfredo sauce on pizza.


 The result was a garlic, creamy sauce that complimented the veggies wonderfully.


White Bean Italian Pizza - Finding Joy in My Kitchen

1 recipe, no-rise pizza crust
1/2 (14oz) can white beans (like Great White Northern), rinsed and drained
4 garlic cloves, minced
1/2 - 1 T milk
2 tsp. Italian seasoning
2 C fresh spinach, cleaned and trimmed
1/2 red bell pepper, diced
4 oz fresh mushrooms, sliced
~1 1/2 C shredded cheeses (we used Havarti and cheddar)

Prepare pizza crust according to directions in the pizza crust recipe.

Combine the beans, garlic cloves and milk in a blender.


Puree until beans are smooth. Mix in 1 tsp. of Italian seasoning.

Spread the white bean sauce in a thin layer over prepared pizza crust.


Top with toppings. We used spinach, red pepper and mushrooms.


Top with cheese. We used cheddar and Havarti.


Sprinkle with remaining 1 tsp. of Italian seasoning.  And, if desired, a twist of freshly ground sea salt and pepper.


Bake at 450 for 15-20 minutes, until cheese is bubbly and browned.


Enjoy the delicious garlic scent flooding your kitchen.


Slice and serve.


The crust recipe makes two pizza crusts, but the toppings for this recipe make one large pizza.  Adjust accordingly by either freezing the other pizza crust {directions here} or upping the toppings to make two pizzas.  

Photobucket


Made from Scratch Tuesday, Delicious Dishes, Take a Look Tuesday, Slightly Indulgent Tuesday, Hearth and Soul, Full Plate Thursday, This Week's Cravings